Thursday, May 28, 2020
Wednesday, May 27, 2020
how to creat Create an Animated Side Navigation,how to make Create an Animated Side Navigation.how to craet Create an Animated Side Navigation with codes ,Create an Animated Side Navigation without easy just copy and past the code,step by step Create an Animated Side Navigation,best way to creat Create an Animated Side Navigation with stylish design,

How TO - Side Navigation
Learn how to create an animated, closable side navigation menu.
Create an Animated Side Navigation
Step 1) Add HTML:
Example
<div id="mySidenav" class="sidenav">
<a href="javascript:void(0)"
class="closebtn" onclick="closeNav()">×</a>
<a href="#">About</a>
<a href="#">Services</a>
<a href="#">Clients</a>
<a href="#">Contact</a>
</div>
<!-- Use any element to open the sidenav -->
<span onclick="openNav()">open</span>
<!-- Add all page content inside this div if you want the side nav to
push page content to the right (not used if you only want the sidenav to
sit on top of the page -->
<div id="main">
...
</div>
Step 2) Add CSS:
Example
/* The side navigation menu */
.sidenav {
height: 100%; /*
100% Full-height */
width: 0; /* 0 width - change this
with JavaScript */
position: fixed; /* Stay in place
*/
z-index: 1; /* Stay on top */
top: 0; /* Stay at the top */
left: 0;
background-color: #111; /* Black*/
overflow-x: hidden; /* Disable horizontal scroll */
padding-top: 60px; /* Place content 60px from the top */
transition: 0.5s; /* 0.5 second transition effect to slide in the sidenav */
}
/* The navigation menu links */
.sidenav a {
padding: 8px 8px 8px 32px;
text-decoration: none;
font-size: 25px;
color: #818181;
display: block;
transition: 0.3s;
}
/* When you mouse over the navigation links,
change their color */
.sidenav a:hover {
color: #f1f1f1;
}
/* Position and style the close button (top
right corner) */
.sidenav .closebtn {
position:
absolute;
top: 0;
right: 25px;
font-size: 36px;
margin-left: 50px;
}
/* Style page content - use this if you want to push the page content to
the right when you open the side navigation */
#main {
transition: margin-left .5s;
padding: 20px;
}
/* On smaller screens, where height is less than
450px, change the style of the sidenav (less padding and a smaller font
size) */
@media screen and (max-height: 450px) {
.sidenav
{padding-top: 15px;}
.sidenav a {font-size: 18px;}
}
Step 3) Add JavaScript:
The example below slides in the side navigation, and makes it 250px wide:
Sidenav Overlay Example
/* Set
the width of the side navigation to 250px */
function
openNav() {
document.getElementById("mySidenav").style.width
= "250px";
}
/*
Set the width of the side navigation to 0 */
function closeNav() {
document.getElementById("mySidenav").style.width = "0";
}
The example below slides in the side navigation, and pushes the page content to the right (the value used to set the width of the sidenav is also used to set the left margin of the "page content"):
Sidenav Push Content
/* Set the width of the side navigation to 250px and the left margin of the
page content to 250px */
function
openNav() {
document.getElementById("mySidenav").style.width
= "250px";
document.getElementById("main").style.marginLeft
= "250px";
}
/* Set the width of the side navigation to 0 and the
left margin of the page content to 0 */
function closeNav() {
document.getElementById("mySidenav").style.width = "0";
document.getElementById("main").style.marginLeft = "0";
}
The example below also slides in the side navigation, and pushes the page content to the right, only this time, we add a black background color with a 40% opacity to the body element, to "highlight" the side navigation:
Sidenav Push Content w/ opacity
/* Set the width of the side navigation to 250px and the left margin of the
page content to 250px and add a black background color to body */
function
openNav() {
document.getElementById("mySidenav").style.width
= "250px";
document.getElementById("main").style.marginLeft
= "250px";
document.body.style.backgroundColor = "rgba(0,0,0,0.4)";
}
/* Set the width of the side navigation to 0 and the
left margin of the page content to 0, and the background color of body to
white */
function closeNav() {
document.getElementById("mySidenav").style.width = "0";
document.getElementById("main").style.marginLeft = "0";
document.body.style.backgroundColor = "white";
}
The example below slides in the side navigation from the left and covers the whole page (100% width):
Sidenav Full-width:
/* Open the sidenav */
function
openNav() {
document.getElementById("mySidenav").style.width
= "100%";
}
/* Close/hide the sidenav */
function closeNav() {
document.getElementById("mySidenav").style.width = "0";
}
The example below opens and close the side navigation menu without animations:
Sidenav without Animation
/* Open the sidenav */
function
openNav() {
document.getElementById("mySidenav").style.display
= "block";
}
/* Close/hide the sidenav */
function closeNav() {
document.getElementById("mySidenav").style.display = "none";
}
The example below shows how to create a right-sided navigation menu:
Right-sided navigation:
.sidenav {
right: 0;
}
The example below shows how to create a side navigation menu that is always shown (fixed):
Always show sidenav:
/* The sidenav */
.sidenav {
height: 100%;
width:
200px;
position: fixed;
z-index: 1;
top: 0;
left: 0;
background-color: #111;
overflow-x: hidden;
padding-top: 20px;
}
/* Page content */
.main {
margin-left: 200px; /* Same as the width of the sidenav */
}
Sunday, May 24, 2020
what is XML what is stand for XML,how to use XML,what does mean by XML,step by step XML,how to make product list in XML.codes of XML.why we learn XML,Why Study XMLWhat You Will Learn,How does XML work?,How can I use XML?,What can I use XML for?

XML stands for eXtensible Markup Language.
XML was designed to store and transport data.
XML was designed to be both human- and machine-readable.
XML Example 1
Friday, May 22, 2020
what is Java If ... Else,how to use Java If ... Else,what is Java Conditions and If Statements, step by step learning java topic and Java Conditions and If Statements,easy notes of Java Conditions and If Statements

Java Conditions and If Statements
Java supports the usual logical conditions from mathematics:
- Less than: a < b
- Less than or equal to: a <= b
- Greater than: a > b
- Greater than or equal to: a >= b
- Equal to a == b
- Not Equal to: a != b
how to rerecord your PC screen, free download screen recorder,what is screen recorder how to record video ,Capture your computer screen and save it as a video file (AVI, MP4),recorder for games ,recorder for PC recorder.
How to Record Your Computer Screen
Capture your computer screen and save it as a video file (AVI, MP4)
Recording computer screens has never been easier. Modern technology has made it possible for the recording of many devices like computers or smartphones. Today, anyone can record their computer screen with audio and upload it to YouTube in a few clicks. Why don't you try Bandicam, the most advanced screen recording program? It will allow you to capture computer screens, video tutorials, online academic lessons, and walk through.
How to Record Your Computer Screen using Bandicam
With screen recording software, anyone can record lectures,
webinars, PowerPoint and Skype video calls with computer sound and
audio narration from the microphone. If you use Bandicam Screen
Recorder, you can record everything on your PC screen with computer
sound.
Please follow the steps below to record your computer screen.
-
Start Bandicam and choose the 'Rectangle on a screen' mode.
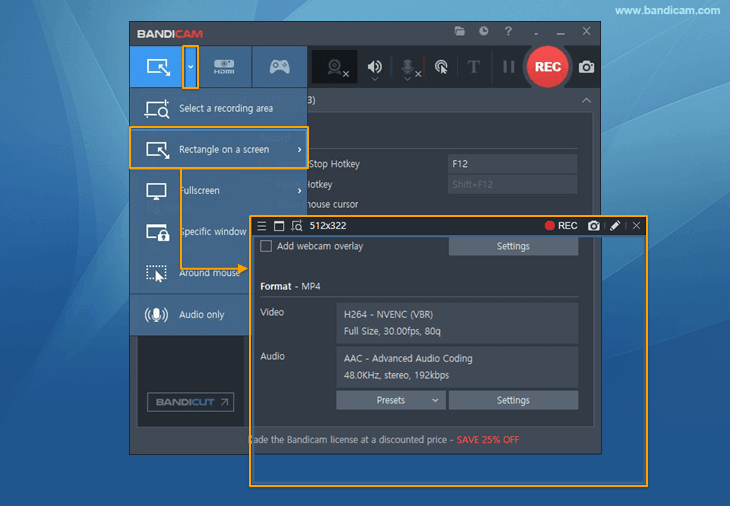
-
Click the '● REC' button or press the hotkey (F12) to start/stop the recording.
Tips
A real-time drawing function is available.
Users can simultaneously draw lines, boxes, or highlights while recording in 'Screen Recording' mode.

How to capture the entire desktop screen of Windows
-
Start Bandicam and choose the 'Fullscreen' mode.
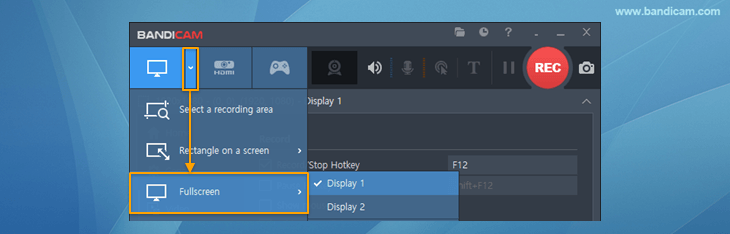
-
Click the '● REC' button or press the hotkey (F12) to start/stop the recording.

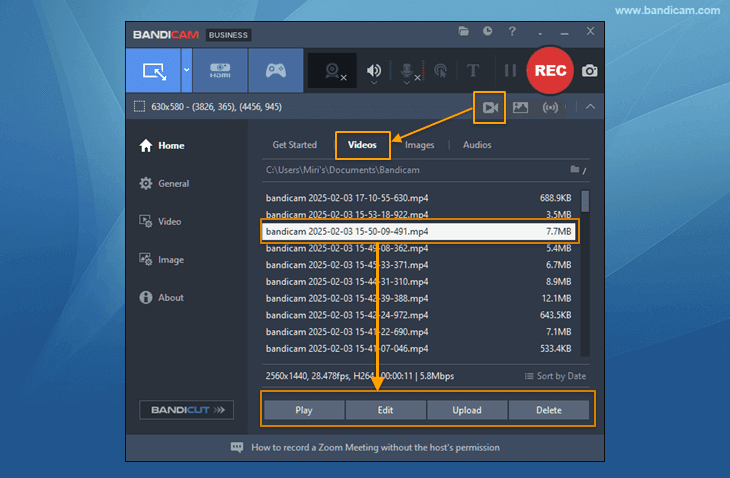
Go to 'Home -> Video' to play, edit or upload the captured videos.
free download

Thursday, May 21, 2020
how to make and creat Tabs
How TO - Tabs
Learn how to create tabs with CSS and JavaScript.
Tabs
Tabs are perfect for single page web applications, or for web pages capable of displaying different subjects:
London
London is the capital city of England.
Create Toggleable Tabs
Step 1) Add HTML:
Example
<!-- Tab links -->
<div class="tab">
<button class="tablinks" onclick="openCity(event,
'London')">London</button>
<button class="tablinks" onclick="openCity(event,
'Paris')">Paris</button>
<button class="tablinks" onclick="openCity(event,
'Tokyo')">Tokyo</button>
</div>
<!-- Tab content -->
<div id="London" class="tabcontent">
<h3>London</h3>
<p>London is the capital city of England.</p>
</div>
<div
id="Paris" class="tabcontent">
<h3>Paris</h3>
<p>Paris
is the capital of France.</p>
</div>
<div id="Tokyo" class="tabcontent">
<h3>Tokyo</h3>
<p>Tokyo is the capital of Japan.</p>
</div>what is Google Maps API,how to use Google Maps API,Google Maps in HTML,Google Maps API coding source,how to use step step Google Maps API(Application Programming Interface)Application Programming Interface use in coding for programming

This tutorial is about the Google Maps API (Application Programming Interface).
An API is a set of methods and tools that can be used for building software applications.
Google Maps in HTML
This example creates a Google Map in HTML:
Example
<!DOCTYPE html>
<html>
<body>
<h1>My First Google Map</h1>
<div id="googleMap" style="width:100%;height:400px;"></div>
<script>
function myMap() {
var mapProp= {
center:new
google.maps.LatLng(51.508742,-0.120850),
zoom:5,
};
var map = new google.maps.Map(document.getElementById("googleMap"),mapProp);
}
</script>
<script src="https://maps.googleapis.com/maps/api/js?key=YOUR_KEY&callback=myMap"></script>
</body>
</html>
Subscribe to:
Comments (Atom)