Thursday, May 28, 2020
Wednesday, May 27, 2020
how to creat Create an Animated Side Navigation,how to make Create an Animated Side Navigation.how to craet Create an Animated Side Navigation with codes ,Create an Animated Side Navigation without easy just copy and past the code,step by step Create an Animated Side Navigation,best way to creat Create an Animated Side Navigation with stylish design,

How TO - Side Navigation
Learn how to create an animated, closable side navigation menu.
Create an Animated Side Navigation
Step 1) Add HTML:
Example
<div id="mySidenav" class="sidenav">
<a href="javascript:void(0)"
class="closebtn" onclick="closeNav()">×</a>
<a href="#">About</a>
<a href="#">Services</a>
<a href="#">Clients</a>
<a href="#">Contact</a>
</div>
<!-- Use any element to open the sidenav -->
<span onclick="openNav()">open</span>
<!-- Add all page content inside this div if you want the side nav to
push page content to the right (not used if you only want the sidenav to
sit on top of the page -->
<div id="main">
...
</div>
Step 2) Add CSS:
Example
/* The side navigation menu */
.sidenav {
height: 100%; /*
100% Full-height */
width: 0; /* 0 width - change this
with JavaScript */
position: fixed; /* Stay in place
*/
z-index: 1; /* Stay on top */
top: 0; /* Stay at the top */
left: 0;
background-color: #111; /* Black*/
overflow-x: hidden; /* Disable horizontal scroll */
padding-top: 60px; /* Place content 60px from the top */
transition: 0.5s; /* 0.5 second transition effect to slide in the sidenav */
}
/* The navigation menu links */
.sidenav a {
padding: 8px 8px 8px 32px;
text-decoration: none;
font-size: 25px;
color: #818181;
display: block;
transition: 0.3s;
}
/* When you mouse over the navigation links,
change their color */
.sidenav a:hover {
color: #f1f1f1;
}
/* Position and style the close button (top
right corner) */
.sidenav .closebtn {
position:
absolute;
top: 0;
right: 25px;
font-size: 36px;
margin-left: 50px;
}
/* Style page content - use this if you want to push the page content to
the right when you open the side navigation */
#main {
transition: margin-left .5s;
padding: 20px;
}
/* On smaller screens, where height is less than
450px, change the style of the sidenav (less padding and a smaller font
size) */
@media screen and (max-height: 450px) {
.sidenav
{padding-top: 15px;}
.sidenav a {font-size: 18px;}
}
Step 3) Add JavaScript:
The example below slides in the side navigation, and makes it 250px wide:
Sidenav Overlay Example
/* Set
the width of the side navigation to 250px */
function
openNav() {
document.getElementById("mySidenav").style.width
= "250px";
}
/*
Set the width of the side navigation to 0 */
function closeNav() {
document.getElementById("mySidenav").style.width = "0";
}
The example below slides in the side navigation, and pushes the page content to the right (the value used to set the width of the sidenav is also used to set the left margin of the "page content"):
Sidenav Push Content
/* Set the width of the side navigation to 250px and the left margin of the
page content to 250px */
function
openNav() {
document.getElementById("mySidenav").style.width
= "250px";
document.getElementById("main").style.marginLeft
= "250px";
}
/* Set the width of the side navigation to 0 and the
left margin of the page content to 0 */
function closeNav() {
document.getElementById("mySidenav").style.width = "0";
document.getElementById("main").style.marginLeft = "0";
}
The example below also slides in the side navigation, and pushes the page content to the right, only this time, we add a black background color with a 40% opacity to the body element, to "highlight" the side navigation:
Sidenav Push Content w/ opacity
/* Set the width of the side navigation to 250px and the left margin of the
page content to 250px and add a black background color to body */
function
openNav() {
document.getElementById("mySidenav").style.width
= "250px";
document.getElementById("main").style.marginLeft
= "250px";
document.body.style.backgroundColor = "rgba(0,0,0,0.4)";
}
/* Set the width of the side navigation to 0 and the
left margin of the page content to 0, and the background color of body to
white */
function closeNav() {
document.getElementById("mySidenav").style.width = "0";
document.getElementById("main").style.marginLeft = "0";
document.body.style.backgroundColor = "white";
}
The example below slides in the side navigation from the left and covers the whole page (100% width):
Sidenav Full-width:
/* Open the sidenav */
function
openNav() {
document.getElementById("mySidenav").style.width
= "100%";
}
/* Close/hide the sidenav */
function closeNav() {
document.getElementById("mySidenav").style.width = "0";
}
The example below opens and close the side navigation menu without animations:
Sidenav without Animation
/* Open the sidenav */
function
openNav() {
document.getElementById("mySidenav").style.display
= "block";
}
/* Close/hide the sidenav */
function closeNav() {
document.getElementById("mySidenav").style.display = "none";
}
The example below shows how to create a right-sided navigation menu:
Right-sided navigation:
.sidenav {
right: 0;
}
The example below shows how to create a side navigation menu that is always shown (fixed):
Always show sidenav:
/* The sidenav */
.sidenav {
height: 100%;
width:
200px;
position: fixed;
z-index: 1;
top: 0;
left: 0;
background-color: #111;
overflow-x: hidden;
padding-top: 20px;
}
/* Page content */
.main {
margin-left: 200px; /* Same as the width of the sidenav */
}
Sunday, May 24, 2020
what is XML what is stand for XML,how to use XML,what does mean by XML,step by step XML,how to make product list in XML.codes of XML.why we learn XML,Why Study XMLWhat You Will Learn,How does XML work?,How can I use XML?,What can I use XML for?

XML stands for eXtensible Markup Language.
XML was designed to store and transport data.
XML was designed to be both human- and machine-readable.
XML Example 1
Friday, May 22, 2020
what is Java If ... Else,how to use Java If ... Else,what is Java Conditions and If Statements, step by step learning java topic and Java Conditions and If Statements,easy notes of Java Conditions and If Statements

Java Conditions and If Statements
Java supports the usual logical conditions from mathematics:
- Less than: a < b
- Less than or equal to: a <= b
- Greater than: a > b
- Greater than or equal to: a >= b
- Equal to a == b
- Not Equal to: a != b
how to rerecord your PC screen, free download screen recorder,what is screen recorder how to record video ,Capture your computer screen and save it as a video file (AVI, MP4),recorder for games ,recorder for PC recorder.
How to Record Your Computer Screen
Capture your computer screen and save it as a video file (AVI, MP4)
Recording computer screens has never been easier. Modern technology has made it possible for the recording of many devices like computers or smartphones. Today, anyone can record their computer screen with audio and upload it to YouTube in a few clicks. Why don't you try Bandicam, the most advanced screen recording program? It will allow you to capture computer screens, video tutorials, online academic lessons, and walk through.
How to Record Your Computer Screen using Bandicam
With screen recording software, anyone can record lectures,
webinars, PowerPoint and Skype video calls with computer sound and
audio narration from the microphone. If you use Bandicam Screen
Recorder, you can record everything on your PC screen with computer
sound.
Please follow the steps below to record your computer screen.
-
Start Bandicam and choose the 'Rectangle on a screen' mode.
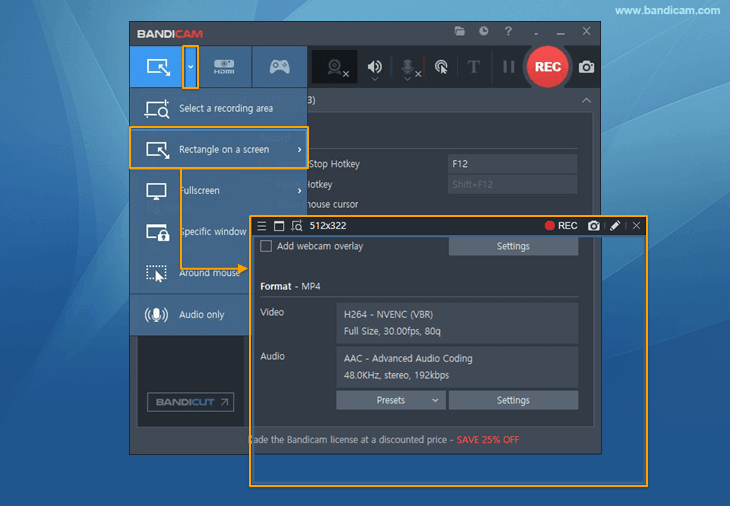
-
Click the '● REC' button or press the hotkey (F12) to start/stop the recording.
Tips
A real-time drawing function is available.
Users can simultaneously draw lines, boxes, or highlights while recording in 'Screen Recording' mode.

How to capture the entire desktop screen of Windows
-
Start Bandicam and choose the 'Fullscreen' mode.
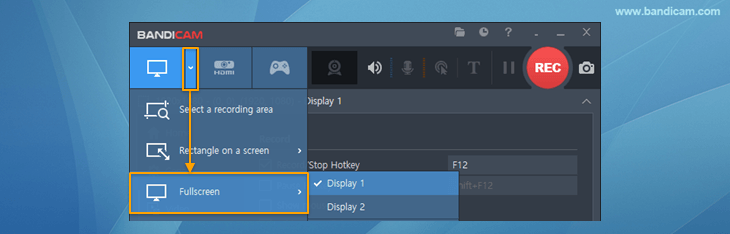
-
Click the '● REC' button or press the hotkey (F12) to start/stop the recording.

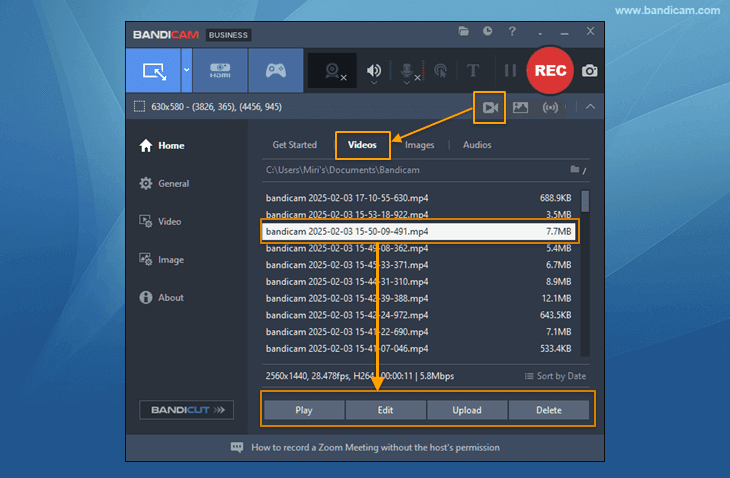
Go to 'Home -> Video' to play, edit or upload the captured videos.
free download

Thursday, May 21, 2020
how to make and creat Tabs
How TO - Tabs
Learn how to create tabs with CSS and JavaScript.
Tabs
Tabs are perfect for single page web applications, or for web pages capable of displaying different subjects:
London
London is the capital city of England.
Create Toggleable Tabs
Step 1) Add HTML:
Example
<!-- Tab links -->
<div class="tab">
<button class="tablinks" onclick="openCity(event,
'London')">London</button>
<button class="tablinks" onclick="openCity(event,
'Paris')">Paris</button>
<button class="tablinks" onclick="openCity(event,
'Tokyo')">Tokyo</button>
</div>
<!-- Tab content -->
<div id="London" class="tabcontent">
<h3>London</h3>
<p>London is the capital city of England.</p>
</div>
<div
id="Paris" class="tabcontent">
<h3>Paris</h3>
<p>Paris
is the capital of France.</p>
</div>
<div id="Tokyo" class="tabcontent">
<h3>Tokyo</h3>
<p>Tokyo is the capital of Japan.</p>
</div>what is Google Maps API,how to use Google Maps API,Google Maps in HTML,Google Maps API coding source,how to use step step Google Maps API(Application Programming Interface)Application Programming Interface use in coding for programming

This tutorial is about the Google Maps API (Application Programming Interface).
An API is a set of methods and tools that can be used for building software applications.
Google Maps in HTML
This example creates a Google Map in HTML:
Example
<!DOCTYPE html>
<html>
<body>
<h1>My First Google Map</h1>
<div id="googleMap" style="width:100%;height:400px;"></div>
<script>
function myMap() {
var mapProp= {
center:new
google.maps.LatLng(51.508742,-0.120850),
zoom:5,
};
var map = new google.maps.Map(document.getElementById("googleMap"),mapProp);
}
</script>
<script src="https://maps.googleapis.com/maps/api/js?key=YOUR_KEY&callback=myMap"></script>
</body>
</html>
How to Reset Forgotten Windows 10 / 8 / 7 Password,how to use pcunlocker,how to fix forgotten password in window 7/8/10 and...

Whether you are locked out of your own computer or need to help a friend or family member who forgot their Windows password, there could be times when you need to reset a lost Windows password. It’s quite easy to do if you have a bootable disk like PCUnlocker. This tutorial will walk you through the process of making a PCUnlocker Live CD, and booting your PC from CD to reset forgotten Windows 10 / 8 / 7 password easily.
Making Bootable PCUnlocker CD
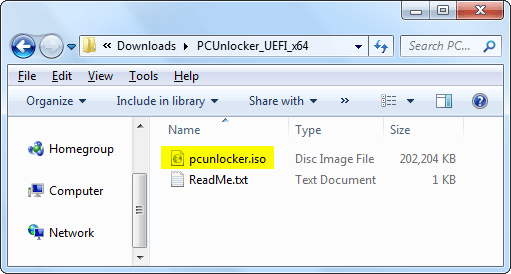
The first thing to do is download the ZIP file for PCUnlocker using another PC you can access. Next, extract the contents of the ZIP file to a folder on your hard disk. Open the extracted folder in Windows Explorer, and you’ll see an ISO file named pcunlocker.iso that you need to burn to a CD (or USB).
To make a bootable CD (or USB drive) from that ISO file, I’ll be using the freeware ISO2Disc. Insert a blank CD and open up ISO2Disc, navigate to the ISO file in the unzipped files. Choose the “Burn to CD/DVD” option and click on Start Burn.
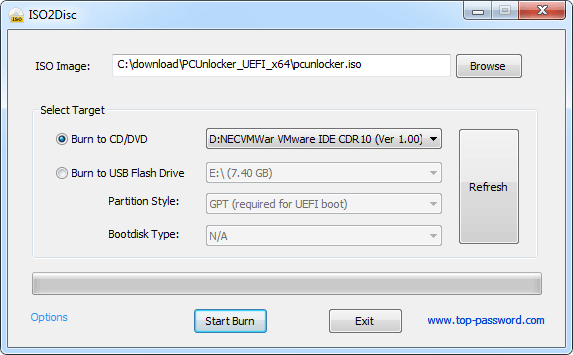
This will create a bootable PCUnlocker CD in minutes. Note: If you don’t have a blank CD around, you can make a bootable USB of PCUnlocker instead.
Boot Your PC from CD
Once you have a bootable PCUnlocker CD, insert it into the computer whose password you want to reset. As soon as you turn on the computer, press a system defined key (such as F12, ESC, DEL, F2) to access BIOS. Go to the BOOT menu and set CD/DVD as first boot option.
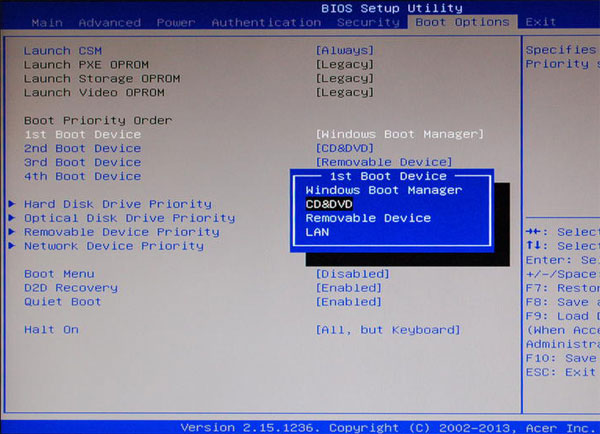
After you’ve changed the boot priority, save the BIOS settings and restart your PC. It should now boot into PCUnlocker CD.
Reset Forgotten Windows Password
When you’ve booted to CD, PCUnlocker will find the Windows operating systems that were installed on your hard drive. Select one of your user accounts in the list, and click on Reset Password button to proceed.
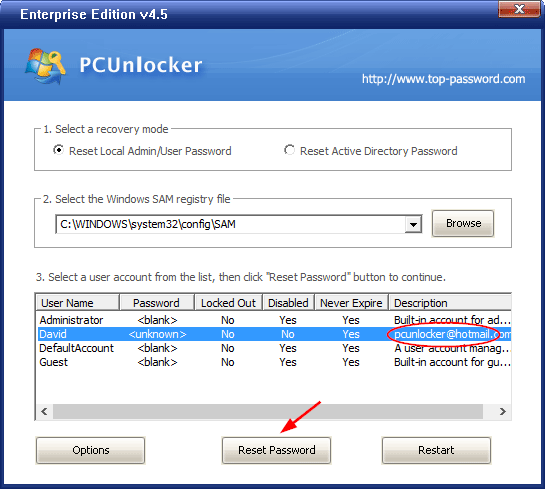
This will open the Change Password dialog, letting you enter a new password or leave it blank to remove password. If you’ve chosen a local account that was connected to a Microsoft account, you’ll get the warning that the program will convert your Microsoft account back to local user.

Once you click OK, your Windows password will be reset immediately. Reboot your computer and reverse the changes you made to BIOS. You can then log back in to Windows with the new password!
System Requirements For PCUnlocker WinPE 3.8.0 Enterprise Edition ISO
Before you start PCUnlocker WinPE 3.8.0 Enterprise Edition ISO free download, make sure your PC meets minimum system requirements.
- Operating System: Windows XP/Vista/7/8/8.1/10
- Memory (RAM): 1 GB of RAM required.
- Hard Disk Space: 60 MB of free space required.
- Processor: Intel Pentium 4 or later.


Wednesday, May 20, 2020
free download the managment software for school,project of IT for university,best project of computer managgement

free download the management software for school,project

How To Create a Modal Login Form,
How To Create a Modal Login Form

when press on icon form will be open login hide form
Step 1) Add HTML:
Example
<!-- Button to open the modal login form -->
<button onclick="document.getElementById('id01').style.display='block'">Login</button>
<!-- The Modal -->
<div id="id01" class="modal">
<span onclick="document.getElementById('id01').style.display='none'"
class="close" title="Close Modal">×</span>
<!-- Modal Content -->
<form class="modal-content animate" action="/action_page.php">
<div class="imgcontainer">
<img src="img_avatar2.png"
alt="Avatar" class="avatar">
</div>
<div
class="container">
<label for="uname"><b>Username</b></label>
<input
type="text" placeholder="Enter Username" name="uname" required>
<label for="psw"><b>Password</b></label>
<input
type="password" placeholder="Enter Password" name="psw" required>
<button type="submit">Login</button>
<label>
<input type="checkbox" checked="checked"
name="remember"> Remember me
</label>
</div>
<div class="container"
style="background-color:#f1f1f1">
<button
type="button" onclick="document.getElementById('id01').style.display='none'"
class="cancelbtn">Cancel</button>
<span class="psw">Forgot <a href="#">password?</a></span>
</div>
</form>
</div>
Step 2) Add CSS:
Example
/* The Modal (background) */
.modal {
display:
none; /* Hidden by default */
position: fixed; /* Stay
in place */
z-index: 1; /* Sit on top */
left: 0;
top: 0;
width: 100%; /*
Full width */
height: 100%; /* Full height */
overflow: auto; /* Enable scroll if needed */
background-color: rgb(0,0,0); /* Fallback color */
background-color: rgba(0,0,0,0.4); /* Black w/ opacity */
padding-top: 60px;
}
/* Modal Content/Box */
.modal-content
{
background-color: #fefefe;
margin: 5px auto; /* 15% from the top and centered */
border: 1px solid #888;
width: 80%; /* Could be more
or less, depending on screen size */
}
/* The Close Button */
.close {
/* Position it in the top right corner
outside of the modal */
position: absolute;
right: 25px;
top: 0;
color:
#000;
font-size: 35px;
font-weight: bold;
}
/*
Close button on hover */
.close:hover,
.close:focus
{
color: red;
cursor: pointer;
}
/* Add Zoom Animation */
.animate {
-webkit-animation: animatezoom 0.6s;
animation: animatezoom 0.6s
}
@-webkit-keyframes animatezoom {
from
{-webkit-transform: scale(0)}
to {-webkit-transform:
scale(1)}
}
@keyframes
animatezoom {
from {transform: scale(0)}
to {transform: scale(1)}
}
Tip: You can also use the following javascript to close the modal by clicking outside of the modal content (and not just by using the "x" or "cancel" button to close it):
Example
<script>
// Get the modal
var modal = document.getElementById('id01');
// When the user clicks anywhere outside of the modal, close it
window.onclick = function(event) {
if (event.target ==
modal) {
modal.style.display =
"none";
}
}
</script>
How To Create a Login Form,step by step to How To Create a Login Form,easy to way How To Create a Login Form,How To Create a Login Form with coding source

How To Create a Login Form
Step 1) Add HTML:
Add an image inside a container and add inputs (with a matching label) for each field. Wrap a <form> element around them to process the input. You can learn more about how to process input in our PHP tutorial.
Example
<form action="action_page.php" method="post">
<div class="imgcontainer">
<img src="img_avatar2.png" alt="Avatar"
class="avatar">
</div>
<div
class="container">
<label for="uname"><b>Username</b></label>
<input type="text" placeholder="Enter Username" name="uname" required>
<label for="psw"><b>Password</b></label>
<input type="password" placeholder="Enter Password" name="psw" required>
<button type="submit">Login</button>
<label>
<input
type="checkbox" checked="checked" name="remember"> Remember me
</label>
</div>
<div class="container" style="background-color:#f1f1f1">
<button type="button" class="cancelbtn">Cancel</button>
<span class="psw">Forgot <a href="#">password?</a></span>
</div>
</form>
Step 2) Add CSS:
Example
/* Bordered form */
form {
border: 3px solid #f1f1f1;
}
/* Full-width inputs */
input[type=text], input[type=password] {
width: 100%;
padding: 12px 20px;
margin: 8px 0;
display: inline-block;
border: 1px solid #ccc;
box-sizing: border-box;
}
/* Set a style for all buttons */
button {
background-color: #4CAF50;
color: white;
padding:
14px 20px;
margin: 8px 0;
border: none;
cursor: pointer;
width:
100%;
}
/* Add a hover effect for buttons */
button:hover {
opacity: 0.8;
}
/* Extra style for the cancel button (red) */
.cancelbtn {
width: auto;
padding: 10px 18px;
background-color: #f44336;
}
/* Center the avatar image inside
this container */
.imgcontainer {
text-align:
center;
margin: 24px 0 12px 0;
}
/* Avatar
image */
img.avatar {
width: 40%;
border-radius: 50%;
}
/* Add padding to containers */
.container {
padding: 16px;
}
/* The "Forgot password" text */
span.psw {
float: right;
padding-top: 16px;
}
/* Change styles for span and cancel button on extra small screens */
@media screen and (max-width: 300px) {
span.psw {
display: block;
float: none;
}
.cancelbtn {
width: 100%;
}
} what is Java Booleans,Boolean Expression,stepby step Java Booleans,EASY WAY TO LEARN Java Booleans,how to use Java Booleans

Java Boolean
Very often, in programming, you will need a data type that can only have one of two values, like:
- YES / NO
- ON / OFF
- TRUE / FALSE
For this, Java has a boolean data type, which can take the values true or false.
Boolean Values
A boolean type is declared with the boolean keyword and can only take the values true or false:
Example
boolean isJavaFun = true;
boolean isFishTasty = false;
System.out.println(isJavaFun);     // Outputs true
System.out.println(isFishTasty);   // Outputs false
However, it is more common to return boolean values from boolean expressions, for conditional testing (see below).
Boolean Expression
A Boolean expression is a Java expression that returns a Boolean value: true or false.
You can use a comparison operator, such as the greater than (>) operator to find out if an expression (or a variable) is true:
Example
int x = 10;
int y = 9;
System.out.println(x > y); // returns true, because 10 is higher than 9
Or even easier:
Example
System.out.println(10 > 9); // returns true, because 10 is higher than 9
In the examples below, we use the equal to (==) operator to evaluate an expression:
Example
int x = 10;
System.out.println(x == 10); // returns true, because the value of x is equal to 10
Example
System.out.println(10 == 15); // returns false, because 10 is not equal to 15
The Boolean value of an expression is the basis for all Java comparisons and conditions.
You will learn more about conditions in the next chapter.
what is Java Math,how to use Java Math,use of Java Math in programming,random number Java Math,coding of Java Math,best of java,Java Math,easy way to learn Java Math,step by learning Java Mathand java step

Java Math
The Java Math class has many methods that allows you to perform mathematical tasks on numbers.
Math.max(x,y)
The Math.max(x,y) method can be used to find the highest value of x and
y:
Example
Math.max(5, 10);
Math.min(x,y)
The Math.min(x,y) method can be used to find the lowest value of of x
and y:
Example
Math.min(5, 10);
Math.sqrt(x)
The Math.sqrt(x) method returns the square root of x:
Example
Math.sqrt(64);
Math.abs(x)
The Math.abs(x) method returns the absolute (positive) value of x:
Example
Math.abs(-4.7);
Random Numbers
Math.random() returns a random number between 0.0 (inclusive), and 1.0 (exclusive):
Example
Math.random();
To get more control over the random number, e.g. you only want a random number between 0 and 100, you can use the following formula:
Example
int randomNum = (int)(Math.random() * 101); // 0 to 100
what is Java Strings, how to use String Length,finding character in string,java method,java classes,String Concatenation,Adding Numbers and Strings
Java Strings
Java Strings
Strings are used for storing text.
A String variable contains a collection of characters surrounded by double quotes:
Example
Create a variable of type String and assign it a value:
String greeting = "Hello";
String Length
A String in Java is actually an object, which contain methods that
can perform certain operations on strings. For example, the length of a
string can be found with the length() method:
Example
String txt = "ABCDEFGHIJKLMNOPQRSTUVWXYZ";
System.out.println("The length of the txt string is: " + txt.length());
More String Methods
There are many string methods available, for example toUpperCase() and toLowerCase():
Example
String txt = "Hello World";
System.out.println(txt.toUpperCase());   // Outputs "HELLO WORLD"
System.out.println(txt.toLowerCase());   // Outputs "hello world"
Finding a Character in a String
The indexOf() method returns the index (the position)
of the first occurrence of a specified text in a string
(including whitespace):
Example
String txt = "Please locate where 'locate' occurs!";
System.out.println(txt.indexOf("locate")); // Outputs 7
Java counts positions from zero.
0 is the first position in a
string, 1 is the second, 2 is the third ...
String Concatenation
The + operator can be used between strings to
combine them. This is called concatenation:
Example
String firstName = "John";
String lastName = "Doe";
System.out.println(firstName + " " + lastName);
Note that we have added an empty text (" ") to create a space between firstName and lastName on print.
You can also use the concat() method to concatenate two strings:
Example
String firstName = "John ";
String lastName = "Doe";
System.out.println(firstName.concat(lastName));
Special Characters
Because strings must be written within quotes, Java will misunderstand this string, and generate an error:
String txt = "We are the so-called "Vikings" from the north.";
The solution to avoid this problem, is to use the backslash escape character.
The backslash (\) escape character turns special characters into string characters:
| Escape character | Result | Description |
|---|---|---|
| \' | ' | Single quote |
| \" | " | Double quote |
| \\ | \ | Backslash |
The sequence \" inserts a double quote in a string:
Example
String txt = "We are the so-called \"Vikings\" from the north.";The sequence \' inserts a single quote in a string:
Example
String txt = "It\'s alright.";
The sequence \\ inserts a single backslash in a string:
Example
String txt = "The character \\ is called backslash.";
 |
Adding Numbers and Strings
WARNING!
Java uses the + operator for both addition and concatenation.
Numbers are added. Strings are concatenated.
If you add two numbers, the result will be a number:
Example
int x = 10;
int y = 20;
int z = x + y;      // z will be 30 (an integer/number)
If you add two strings, the result will be a string concatenation:
Example
String x = "10";
String y = "20";
String z = x + y;   // z will be 1020 (a String)
If you add a number and a string, the result will be a string concatenation:
Example
String x = "10";
int y = 20;
String z = x + y;   // z will be 1020 (a String)
Subscribe to:
Posts (Atom)